Datavideo PTC and BC Series
Install and Connection Setup
Troubleshooting
SETTINGS TO CHECK
- DIP switches on the bottom of the camera are set to:
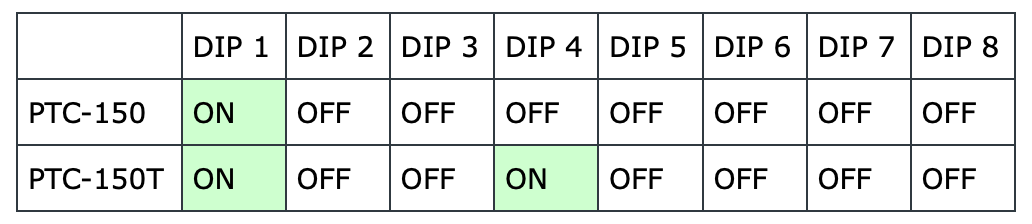
- RS422 Baud Rate in menu is set to 38400 (default)
- DVIP Baud Rate in menu is set to 115200 (default)
- Baud Rate Troubleshooting Guide
- RMC-180 Baud Rate is fixed at 38400 as it only supports RS-422
- Cam Address for each camera in RMC-180 LCD menu is set to 81
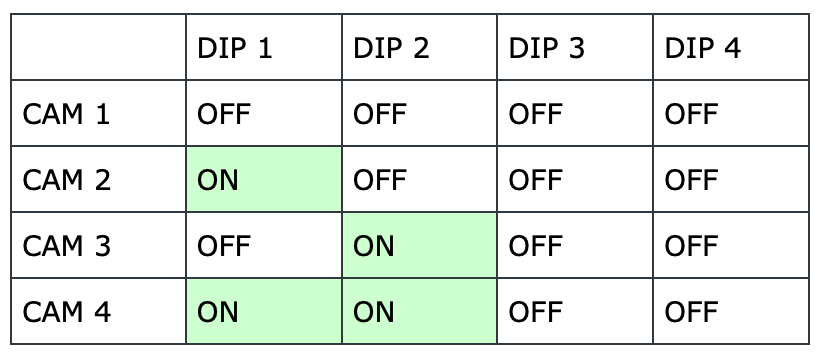
Please note that our cameras do not use multiple VISCA ID's, because each camera is run straight to the controller instead of in series or daisy chained.
So every camera has ID 1, which is reflected in having DIP switch 1 on and 2 and 3 off, followed by all 4 camera addresses in the RMC-180 LCD menu settings set to 81, which is VISCA ID 1.
If you run into the issue where you can not control the camera, please try the following:
- Try a factory reset: Using the IR remote, point at the camera and go to Menu Reset All. It's possible that some connection settings were changed initially troubleshooting the install, so it can not hurt to have a clean slate.
- Check the RMC-180: Press the CH A through CH D buttons on your RMC-180 to see if it can change camera channels. The active channel button will be lit bright red. If the RMC-180 LCD screen is on, you are connected, if you are off, it's not, but if you are able to change channels, then your RMC-180 is likely working.
- Check the Remote Settings: Using the IR remote, point at the camera and go to Menu Remote Control Set RS-422. In the sub-menu, please confirm that the settings are Camera ID Mode: By Switch and Camera ID: 1.
INSTALL TIPS
-
Please use a high-quality CAT6 or higher cable for HDBaseT transmission with the PTC-150T. We recommend a shielded, solid core CAT cable.
-
Stranded and/or unshielded cables may work, but are not recommended as they may fail or have a reduced max distance.
-
For live event use, we recommend a heavy duty cable like Belden 2183R, please note that this model may require special RJ45 connectors because the cable jacket is thicker than other cables.
-
For serial control via RS-422 or DVIP on the PTC-150 and PTC-150T, you can use CAT5 or higher cable, as you are not transmitting power and video over those connections.
- All CAT cables should be terminated with T568B wiring for standard patch cables, do not create any crossover cables.
- If using the RMK-150 wall mount, please check behind the mounted cameras to see if any cables are touching the camera head, as this can explain impeded or stuttering pan motions.
-
If mounting on a tripod, please note that the PTC-150 weighs 6 pounds.
-
Please make sure that cameras are handled by the bottom base and not the head. Carrying a camera by the head may disrupt the motor's alignment, or damage the mechanical components inside.
-
With the camera powered off, please try gently rotating the head by hand all the way left and right a few times, and test again.
-
If you do not see any video output via HDMI from the camera or HBT-11, please check that the HDMI connector is firmly inserted. Sometimes, the strain relief tab gets in the way of the connector, and can be loosened to accommodate the connector.
- We recommend a slimmer profile connector instead of completely removing the strain relief tab to help prevent damaging the HDMI port. Please do not force the HDMI connector into the port at an angle, as they may damage the port as well.
-
Avoid mounting cameras close to any HVAC systems as the vibrations can cause image instability, especially when zoomed in.
-
Also avoid mounting cameras to balconies with foot traffic will vibrate, especially when zoomed in, please avoid these positions if possible.
-
Please make sure the firmware on the cameras and RMC-180 are up to date.
-
PTC-150 Firmware Update Guide
-
RMC-180 Firmware Update Guide (coming soon, please see manual)
-
Once everything is installed and updated, we recommend running the Reset All function in the menu to get the cameras back to factory settings before adjusting them with lighting for their initial setup.
CAMERA WILL NOT
POWER ON
Your camera is booting into sleep mode. Simply select the camera on the RMC-180 controller, then go into the RMC menu and select Power, followed by On.
If the camera does not respond, try selecting the camera on your IR remote and press the remote's power button.
If that does not work, make sure the remote is set to the same IR ID as the IR dip switches on the back of the camera near the video outputs
CAMERA WILL STILL NOT
RESPOND TO PTZ COMMANDS
Please also check the green block connector adapter cables between the HBT-11 and RMC-180, it's possible the wiring is loose and needs to be re-seated in the connector. Push in the individual orange tabs on the green connector, and gently re-seat the wire.