When streaming to YouTube Live, there are 3 different latency settings, which directly affect the quality of your encoded video. Please note that this setting can not be changed once streaming begins, so it is important to adjust this first.
In most cases, you will want to stream with Normal Latency, which results in a 15 to 60 second delay, depending on your bandwidth. Low Latency will result in a 5 to 15 second delay, and Ultra-Low Latency will result in a delay of 2 to 5 seconds.
While lower latency is preferable, it will impact the quality of the encoded video, so if chat or live interaction with your viewers is part of your workflow, you will need to lower the latency and quality.
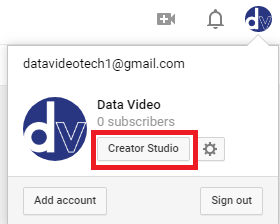
To adjust the latency, first turn off your stream if your encoder is active. Then log into YouTube, and access the Creator Studio, following the below steps:
In the top right corner of the main page, click on your account picture, and click on Creator Studio.
 |
 |
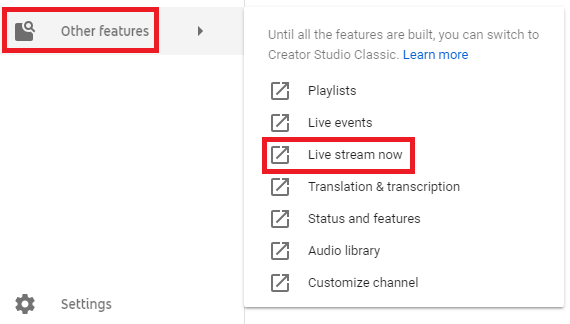
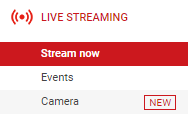
Once inside the live streaming section of the Creator Studio, you will see three options under Live Streaming on the left sidebar. The default is Stream Now. If you need to schedule an event to start at a specific time, click on Events.
There are more steps to creating an Event versus Stream Now, but both have the same latency options. The rest of this guide covers Stream Now, for more on creating Events, please read this YouTube support article.
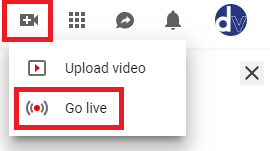
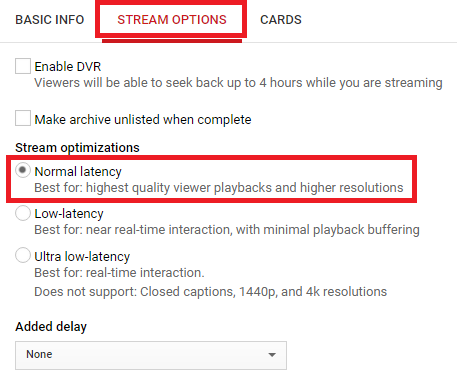
On the Stream Now page, scroll down until you see Stream Options, and click on it. You will see 3 options under Stream Optimizations. Confirm that Normal Latency is selected, or a lower latency if audience interaction is needed.
If the latency options are grayed-out, then you need to stop streaming, refresh the page, and try again.
Start streaming again, and check the preview in full-screen. You should see an improvement in quality if changing from Low Latency to Normal Latency. If not, please read this guide on the optimal settings for your NVS series encoder.
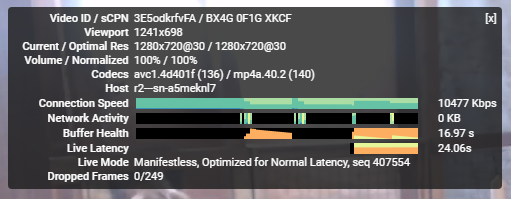
Once your video is live on the channel, you can check the streaming data to monitor latency and dropped frames. The upload bit-rate of your streaming encoder will not display here, as YouTube Live uses adaptive bit-rates, meaning multiple streams of your video at different resolutions and bit-rates are available for your computer to switch between during playback. This ensures a consistent decoded stream if your bandwidth fluctuates too much to support the current stream.
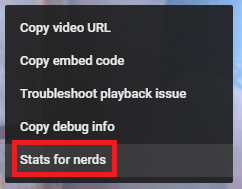
To look at this data, right click on the video inside the player window, and click on Stats For Nerds.
You will then see a small window of statistics about your video. The most relevant settings are Live Latency, Dropped Frames, and Current/Optimal Res.