You will need the following:
-The latest version of the SE-Config software
-A Windows 7 or 8.1 computer with an Ethernet port, or USB Ethernet adapter
-Cat 5 or higher cable
Note that your antivirus or firewall may interfere with connecting your switcher to the software
-Press the Windows Start Button, type View Network Connections until it's highlighted, and press enter.
-Right click Local Area Connection, Left click the Properties button.

-Double Left click the Internet Protocol Version 4 (TCP/IPv4) item.
Note that the switcher's default IP address is 192.168.0.211. If you prefer to change it to match your personal network settings, contact us for additional support if you experience any issues.
-If not selected already, left click the radio button "Use the following IP address:"
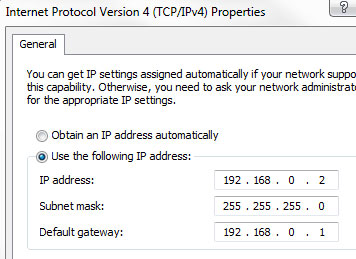
-Set the IPv4 Default Gateway to 192.168.0.1 and IPv4 Address to 192.168.0.2
-Subnet mask will default to 255.255.255.0
Note that if you already use your system’s IPv4 settings for other network tasks, write them down so you can change them back after you complete this process.
If you plan on occasionally connecting to your switcher, consider using a USB 2.0 to Ethernet adapter, this would allow you to set the static IP once for the adapter's network connection and not tie up your main Ethernet port if you use that with another network
-On the 2200, connect the ethernet cable to the port labeled "LAN Service" on the back of your unit near the power supply. Note that the port labeled "LAN" is for serial control via DVIP
-2200 Series Only: Make sure the two Fast Start DIP switches on the rear of the unit are in the up position
-On the 2800, connect the ethernet cable to the port labeled "LAN" on the back of your unit
-Power on your switcher
-On your switcher's keyboard, press the PC Control button, it will turn red and be the only key lit on the switcher keyboard
-Double click the Datavideo Switcher Configuration Utility icon into the tools
Note: If you have previously installed SE-Config, it's recommended that you uninstall it and install the latest version provided by Datavideo
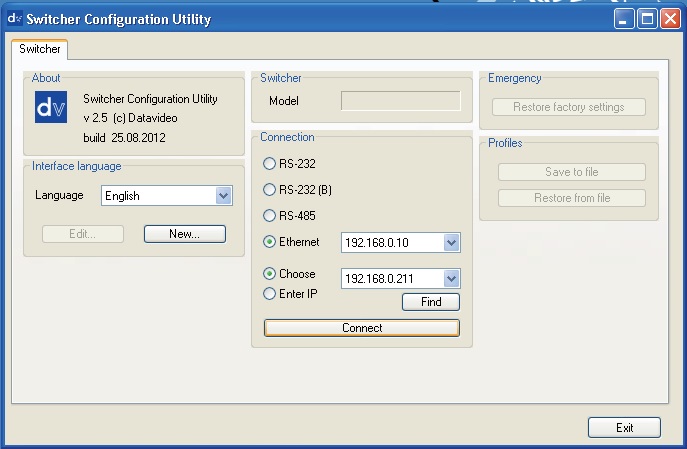
-Select the Ethernet radio button if not already selected and choose 192.168.0.1 from the drop down menu
-Click the Find button to find and display the switcher’s 192.168.0.211 IP Address in the drop down list. The first three numbers in both IP addresses should match
-It should automatically connect, and display your switcher's model number in the box labeled Model
-If not, left click Connect, and it should either connect or display another error message
-If it still does not connect, make sure your firewall and antivirus are disabled
-If that fails to work, check your IPv4 network settings
-If that’s not the issue, try restarting both the PC and switcher, and then retry the steps in this section
Once connected, you can also use the utility to quickly change any of the unit’s settings without having to navigate the unit’s on-screen menu, as well as synchronize the unit’s clock to your PC’s system time
When you are finished, remember to restore any IPv4 network settings that you need to change back for day to day network use, as well as again enabling your firewall and/or antivirus
Please contact us if you have any additional questions or feedback!