PREPARING THE HARD DRIVE
FOR THE UPDATE
-Format the hard drive in the HDR unit by going to Tools Format Media
Please note that there is no need to use the Unlock Media function in the Tools menu for the update.
-Power down the HDR unit
-Remove the hard drive and connect it to your computer via USB
Please note that not all USB cables and ports are the same. Your system may have issues transferring files to the disk. If so, please try a different cable (a shorter cable, or a SATA to USB adapter) or USB bus (rear ports instead of front ports).
You will likely receive a prompt to scan and fix the drive for errors. You can ignore this and select the option "Continue Without Scanning", it is an issue Windows has with the HDR file system. If you would like to bypass this in the future, you can disable Autoplay by following this guide.
Please note that this will disable Autoplay for all devices and is not recommended for most users. In making these changes to your Windows system you are doing so at your own risk, if you need additional assistance, contact Microsoft Support.
-Unzip the firmware file and documentation, copy the correct .bin firmware file to the main/top folder of the HDR hard drive, and rename the .bin file to “flash” (all lowercase).
Both the HDR-60 and HDR-70 use the same .bin firmware file.
The .bin files may have a VLC traffic cone icon because of file associations if you installed VLC Player, but it does not affect the files for the firmware update. Do not open the file in Windows, it will crash VLC.
Please note that Windows already recognizes the .bin extension of the file and truncates it in Windows Explorer. If you type in "flash.bin" when you rename the file, the HDR recorder will not recognize it, simply type "flash".
You need to first look up your current Codec firmware revision to determine which file to copy. You can find it via Tools Firmware Revision, and then select Next to get the version number.
Please note that in the two below examples, X and Y are variables that correspond to multiple versions.
If you have "130 0XX D10B", where 0XX is either 0BA or 0C4:
Copy "HDR70_flash_C3DB_host_C215_codec_C4_ifpga_32_no_NTT.bin" to the HDR hard drive and then rename to "flash.bin"
If you have "130 0XX YYYY", where 0XX can be anything and where YYYY is NOT "D10B":
Copy "HDR70_flash_C3DB_host_C215_codec_C4_ifpga_32_ALL.bin" to the HDR hard drive and then rename to "flash.bin"
-Safely remove/eject the hard drive from your PC
If you hot unplug the drive, you may need to start over as the HDR unit may have difficulty reading the .bin file
RUNNING THE UPDATE
ON THE HDR RECORDER
-Power on the HDR unit with the hard drive inserted and latched and select Tools Upgrade Firmware
If you get a "Wrong Format Media" error while booting, you need to re-format the drive in the HDR recorder and start over again, this is because the HDR recorder does not recognize the file system.
-If you run into an "file not found" error after two attempts after following every step and reading the additional troubleshooting below, or the update freezes or hangs after 20 minutes, please contact Datavideo Support for further assistance
Please allow 15-20 minutes for updates to complete, though they typically take 5 minutes. The system will most times recover from a failed firmware update, but in some rare instances the unit will require service.
When contacting us, please provide unit serial number as well as current firmware revisions for the Rec, Codec, and Host firmware, you can find these via Tools Firmware Revision
|
The current firmware versions are: Recorder FW: 05C3DB10320E06 Codec FW: 130 0C4 D10B Host FW: C215003406 |
The three previous firmware versions are: Recorder FW: 05C3D910320E06 Codec FW: 130 0C4 D10B Host FW: C21203406 Recorder FW: 05C3AA102E0E06 Codec FW: 130 0BA D10B Host FW: F1BC003106 Recorder FW: 05C3A8102C0E06 Codec FW: 130 0BA D10B Host FW: C1BC003106 |
TROUBLESHOOTING
-If you receive an error that no firmware file is found, try the below Windows solutions and repeat the update steps from the beginning
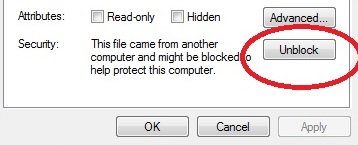
There is a rare issue where the recorder fails to recognize the firmware file. Changing the following file properties in the image below may resolve this. Right click on the firmware file, click "Properties", then under Security, click the "Unblock" button. Please note that these solutions are for Windows 7 and may not work with Windows 10. In making these changes to your Windows system you are doing so at your own risk, if you need additional assistance, contact Microsoft Support.
If that does not resolve the issue try a different USB cable, USB port, or computer. There may be a compatibility issue with your version of Windows, PC hardware settings, Bluetooth settings, USB devices already connected, or 3rd party software installed. There is no simple solution for these issues, but two good starting points would be to try the utilities in the below Microsoft articles. Please note that in using these utilities provided by Microsoft, you are doing so at your own risk. If you need additional assistance, contact Microsoft Support.
Automatically Diagnose and Fix Windows USB Problems (Windows 7/8/10 only)
Hardware Devices are not Working or are not Detected in Windows (Windows 7/8 only)
Also, if you experience an issue where you are unable to safely remove your hard drive from Windows 7, please see this excerpt from the following guide. Please note that in making these changes to your Windows system you are doing so at your own risk, if you need additional assistance, contact Microsoft Support.
-First open Service Manager and ensure that the Bluetooth Support Service is running and set on Automatic.
-To open the service manager, press the start button and type in "Services", you should see an icon with gears.
-Next, open Device Manager and open the Properties box of Disks. Under Policies, ensure that Enable Write caching on the disk is checked. This should then actually work.
-Now right-click on the USB Drive and from the same location in the Properties, change the default setting and select instead Better Performance.
-Now go back to the default Quick Removal setting again.