NVS-31 Streaming Connection Guide and Troubleshooting
Nov 03 2020
|
General Information
NVS-31 Streaming Connection Guide
For HS-1300, HS-1600T, and HS-3200 Switchers
When you connect your HS-1300 to your network and run our IP scanner software, if you are unable to find the unit, it is possible that your network is not assigning it an IP address for a number of reasons:
- Your LAN does not have a router or DHCP server
- Your network administrator blocks new devices
- Your antivirus or firewall prevents communication
Please Note: The streaming encoder and recorder built into the
HS-1300, HS-1600T, and HS-3200 is referred to as the NVS-31.
A few things you can try are:
- Restart your router by powering it off, waiting 10 seconds, and powering on again
-
Restore factory defaults to the encoder:
- Power off the switcher
- Press and hold the Record and Stream buttons simultaneously and power on the switcher
- Wait until the both buttons light up--about 5 seconds--and release the buttons
- Restart your computer
-
If you still have issues, try the following:
- Temporarily disable any antivirus or firewall software
- Make sure that you do not have multiple network adapters (wired and wireless) in the same local range, as this can create conflict
If you continue to have issues, the good news is that the NVS-31 encoder also has a fixed IP address of 192.168.1.60 that you can connect to directly at any time!
This method will allow you to set a static IP for your NVS in the range of the network, and allow you to skip assigning an IP via DHCP.
- Connect your PC directly to the NVS with a standard Ethernet cable.
You do not need a crossover cable for this
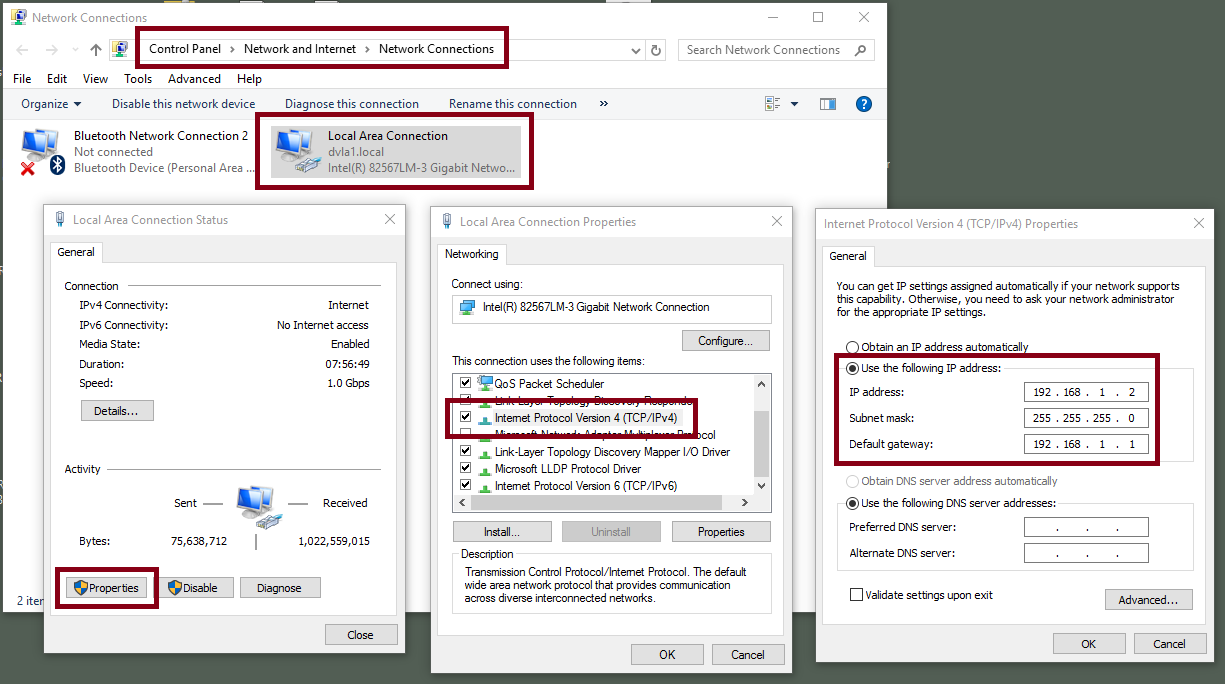
The easiest way to change your network settings in Windows 7 or 10 is to:
- Click the Start button
- Start typing "View Network Connections" and select it when it appears
- Double-click your network adapter for your wired Ethernet connection or LAN
- Click Properties
- Double-click "Internet Protocol Version 4" from the list
- Click the "Use the following IP address" button
- Set your Windows IPv4 settings to:
IP Address: 192.168.1.2
Subnet Mask: 255.255.255.0 (will fill in automatically)
Default Gateway: (can be left blank for direct connections)
-
Remember to write down your settings before changing them, as you will need to revert to those settings once this process is complete
- The NVS-31 is now accessible through 192.168.1.60
-
If you are unable to connect, please try another factory reset of your NVS-31 and try again:
- Power off the switcher
- Press and hold the Record and Stream buttons simultaneously and power on the switcher
- Wait until the both buttons light up--about 5 seconds--and release the buttons
-
Please also make sure that you do not have multiple network adapters (wired and wireless) in the same local range, as this can create conflicts as well.
-
Login using your web browser
- The default username is admin
-
The default password is 000000
-
Click on the Settings tab, followed by Network Settings. Change the IP to a static setting with the same gateway as your network and an IP address that is not already taken.
- For example, if your router's local network's gateway is 10.10.1.1, then you would enter that, and then give the NVS-31 an IP address of 10.10.1.X, where is is a number between 2 and 255 that is not already taken.
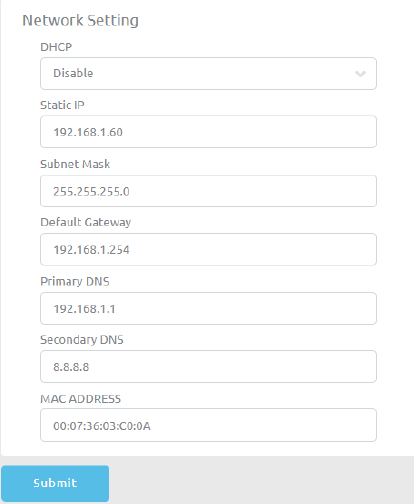
- Dynamic IP Addressing (DHCP): Disable
- Static IP Address: X.X.X.Y, where is X is same IP address as your Router or Switch's LAN, and Y is a number not already taken.
- Subnet Mask: 255.255.255.0
-
Default Gateway: Z.Z.Z.Z, where Z is the same gateway address as your Router or Switch's LAN.
-
Please Note: Some router's may have a different gateway setting in place than the standard 192.168.1.1, so when changing the NVS-25 to a static IP address, check the network status of your computer and see if it is different.
- For Example: Some routers have a gateway of 192.168.1.254, so the Gateway and Primary DNS should be changed to that.
-
Primary DNS: Same as the Default Gateway. If there are issues, you can also resolve to 8.8.8.8 or 8.8.4.4 (Google public DNS addresses).
-
Click Save to make these network settings the new default.
-
Connect your PC and NVS-31 back to the network.
-
Revert your PC's network settings to their previous configuration.
-
Power down the HS-1300, wait 5 seconds, and power on again.
- You should be able to access it now via the static IP address you assigned to the NVS-31.
Advanced Troubleshooting
If you still experience issues, try the following:
- Look for the encoder's MAC address on the network's ARP table. The MAC address is printed on the bottom of your HS switcher.
-
The MAC address starts with 00:07:36:03:xx:xx
- The switcher itself will start with 00:07:36:07:xx:xx
(HS-1300 and HS-3200 only)
- In Command Prompt (or Terminal on MacOS), type "arp -a". A list of ARP entries will appear, and you can see if your NVS-25 shows up on the network

- Run "services.msc", right-click on "DHCP Client", and select "Restart"
- From Command Prompt, type "ipconfig/flushdns", followed by "ipconfig/release" and "ipconfig/renew"
PRODUCTOS RELACIONADOS
Respuestas a las preguntas frecuentes sobre productos

