How to update SE-2200, SE-2800, HS-2850, SE-2850 and HS-2850 Switcher Firmware and PC Configuration via the software utility.
Nov 03 2020
|
SE-2850 & HS-2850
Applies to the HS-2200, SE-2200, HS-2800-8,
HS-2800-12, SE-2800-8, SE-2800-12, SE-2850-8, SE-2850-12 and HS-2850
You will need the following:
-The latest firmware update program provided by Datavideo support
-The latest SEConfig software installer, typically included with the firmware download as a separate .exe file
-A Windows 7 or 10 computer with an Ethernet port or USB to Ethernet adapter
-Cat 5 or higher cable
Note: Once started, the update process should not be interrupted in any way as this could result in a non-responsive unit.
Please disable your firewall and
antivirus for the update process!
The Goal of This Guide:
-Connect your switcher to a network
-Update the firmware if necessary
-Connect to the configuration utility
-Reset your switcher to its defaults
Please note that there are two ways to connect to the SE/HS-2200, SE/HS-2800 and SE/HS-2850.
The first is via a direct connection and configuring your PC's network settings to match the switcher's defaults, and is recommended for users who are new to network configuration or plan to dedicate the PC and it's Ethernet port to the switcher
The second is via a utility that installs along with SE Config called Switcher Network Configuration Utility. This allows you to change the switcher's network settings and use it on your existing network by connecting it to your switch/router
Direct Connection Method
- Press the Windows Start Button
- Begin typing View Network Connections until it's highlighted, and press enter

- In the window, right click Local Area Connection, Left click the Properties button
- Double Left click the Internet Protocol Version 4 (TCP/IPv4) item.
-
Note that the switcher's default IP address is 192.168.0.211. If you prefer to change it to match your personal network settings, contact us for additional support if you experience any issues.
- If not selected already, left click the radio button "Use the following IP address:"
- Set the IPv4 Default Gateway to 192.168.0.1 and IPv4 Address to 192.168.0.2
-
Subnet mask will default to 255.255.255.0
- Note: If you already use your system’s IPv4 settings for other network tasks, write them down so you can change them back after you complete this process
- If you plan on frequently connecting to your switcher to SE Config, please instead follow the Network Utility method below.
-
Alternately, you could use a USB to Ethernet adapter. This would allow you to set the static IP once for the adapter's network connection and not tie up your main Ethernet port if you use that with another network
Network Connection Method
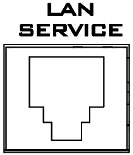
- On the switcher, connect the ethernet cable to the port labeled "LAN Service" on the back of your unit near the power supply. Note that the port labeled "LAN" is for serial control via DVIP
- SE/HS-2200 Series Only: Make sure the two Fast Start DIP switches on the rear of the unit are in the up position
-
On the SE/HS-2800, SE/HS-2850, connect the Ethernet cable to the port labeled "LAN" on the back of your unit
- Press the Windows Start Button
-
Begin typing Switcher Network Configuration Utility until it's highlighted, and press enter
-
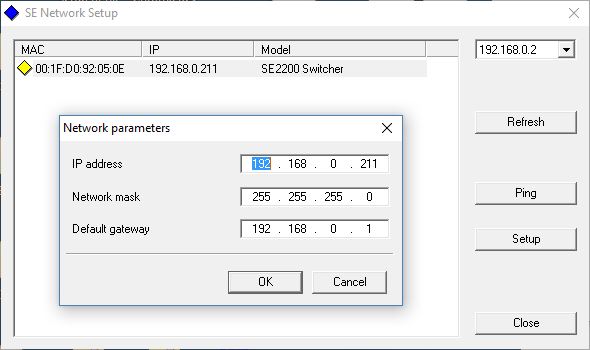
From the drop-down menu in the top right corner of the software, you will see the various gateways of networks your computer is connected to
-
If you do not see your switcher on the list, select a different gateway until it appears
-
Click on your switcher, followed by the Setup button. Change your switcher's IP and gateway settings to match your network
- Press OK, the software will ask that you wait around 30 seconds before trying to connect
 The Firmware Update
-
Power down your switcher if it is not already
-
Run "FlashUpdate_Vxxx.exe", where xxx is the version number
-
On the screen with the supported devices list, click next
-
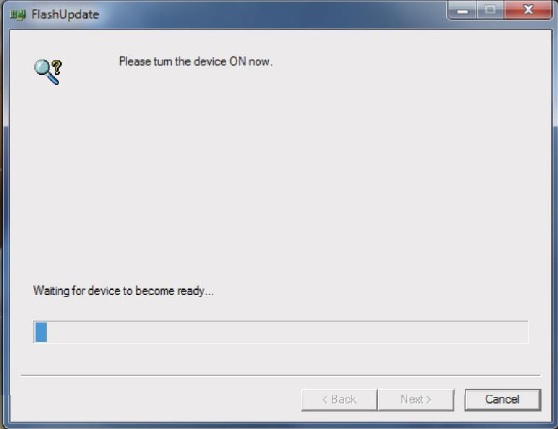
On the screen with the connection options, select the Ethernet radio button and click next
-
You will now see a progress bar and instructions to power on your switcher. After powering on, it should recognize it within a few seconds. If it does not, double check your settings by following the previous steps from the beginning
-
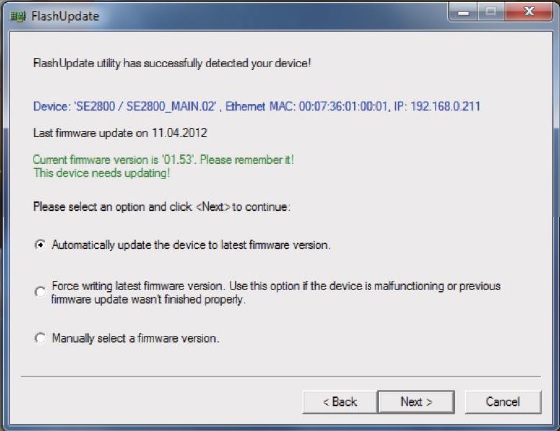
Select Automatically update the device to latest firmware version then click next
-
If you are upgrading a SE-2800/SE-2850 or HS-2800/HS-2850 to 12 channels, select the second option, "Force writing latest firmware version." If you have any issues with the upgrade, please read this troubleshooting guide
-
Click the Yes button to confirm you wish to perform the firmware update.
-
The update process will begin and two progress bars will be shown. The update will take 5-10 minutes to complete.
- Power cycle your switcher. Please continue with the following steps in order to complete the switcher’s update process
Connect To SE Config
-
On your switcher's keyboard, press the PC Control button, it will turn red and be the only key lit
-
Double click the Datavideo Switcher Configuration Utility icon into the tools
-
Note: If you have previously installed SE-Config, it's recommended that you uninstall it and install the latest version included with your firmware download
-
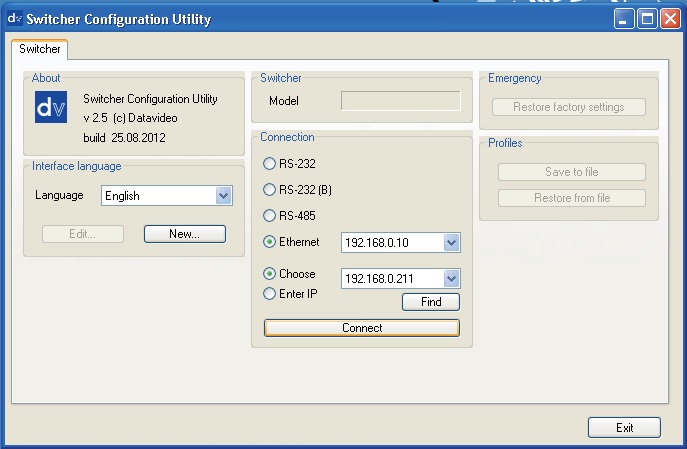
Select the Ethernet radio button if not already selected and choose 192.168.0.1 from the drop down menu
-
Click the Find button to find and display the switcher’s 192.168.0.211 IP Address in the drop down list. The first three numbers in both IP addresses should match
-
It should automatically connect, and display your switcher's model number in the box labeled Model
- If not, left click Connect, and it should either connect or display another error message
Troubleshooting
-
Temporarily disable your firewall and antivirus and try again
-
Check your IPv4 network settings and try again
-
Restart both the PC and switcher and try again
Restore Factory Defaults
-
After updating the firmware and connecting to SE Config, the final step of the update is to restore factory defaults using the software
-
While there is also a factory reset in the switcher's on screen system menu, the reset in SE Config is necessary after each update to finalize it
-
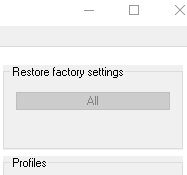
Left click the "All" button near the top right corner of the utility’s window, under "Restore factory settings"
-
This process will take 20 minutes to complete
-
When the progress bar is finished, you can power cycle the switcher and resume normal operation
- You can also use the utility to quickly change any of the unit’s settings without having to navigate the unit’s on-screen menu, as well as synchronize the unit’s clock to your PC’s system time
- When you reboot the switcher, if you see on the multi-view that input 1 is a pink screen, you need to restore factory defaults via the switcher’s menu, not the configuration utility. The pink screen should change to a blue screen with the Datavideo logo. That is the default still image stored on input 1. To turn it off, press and hold the "FS" key, then press the flashing Preset "1" key
When you are finished, remember to restore any IPv4 network settings that you need to change back for day to day network use, as well as again enabling your firewall and/or antivirus
Don’t forget to re-calibrate your T-Bar when finished, by following the instructions in your product manual:
Once connected to SE Config, there are a number of features available to you only through this utility, including, uploading still images, logos, and animated logos
These features are described in the 2800 manuals. This information also applies to the 2200:
If you would like to operate the switcher using a software control panel, a program called SE Remote installed along with SE Config:
Additional Links:
Please contact us if you have any additional questions
[email protected]