| Latest Firmware Versions | Method | |
| SE-650 | SW 1.5.0.6 KB 1.0 | USB |
| SE-700 | SW 1.3.3.5 | USB |
| SE-1200 | SW 1.5.0.6 | Network |
| HS-1200 and HS-1300 | SW 1.5.0.6 | USB |
| SE-3200 and HS-3200 | SW 0.9.6.8 KB 1.6.9 | USB |
Please Note: Do not update these products using the SE-1200 control software, as this may disable the switcher's control panel. Each product uses its own USB update, which are available via our website.
Firmware Update Steps
-Download the latest firmware for your product. Please visit the respective product page and click on the Downloads tab, you will see the USB update in the firmware section.
-Prepare a USB thumb drive formatted to FAT32 (aka Microsoft FAT).
Please read this article if FAT32 or Microsoft FAT is not an option using Windows' format utility, you may need to change your thumb drive's properties.
-Extract the entire sub-folder named “Datavideo” and its contents from the .zip file to the main folder (aka root/top directory) of a USB thumb drive.
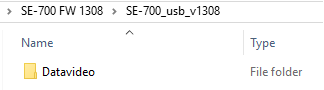
-The folder that you need to copy for this version is called "Datavideo".
Please note the below examples may vary slightly from the .ZIP file you download from our website. All you need is the folder inside called "Datavideo".
SE-650: \Datavideo_SE-650 USB Upgrade V1506\se650 usb v1.5.0.6.zip\Datavideo
HS-1300: \Datavideo_HS-1200_FW_v1506\hs1300 usb v1.5.0.6\Datavideo
-Power off the switcher and connect the USB thumb drive to rear port.
-Power on the switcher, press menu, go to the Setup tab. (If you do not see the Setup tab, then the switcher has not detected the USB stick, please check your file format to resolve)
-Go to Software Update, place cursor on Upgrade.
-Press enter, it will turn from yellow to green.
-Press enter again, it will turn red, and wait.
Depending on your current firmware version, this may be a pop-up window to confirm that you want to update.
-When it turns yellow again, power down switcher.
-Wait 5 seconds, then power on.
-The PGM and/or PST row buttons will eventually turn red or green one by one, depending on product model number and previous firmware version installed.
-Then some/all keys will flash in sync between blue and red/green, and you can proceed to the next step
-Depending on which version you are updating from, some units may not go through the previous two steps. This is not an error, you can proceed to the next section if it boots fully, but wait 5-10 minutes to be safe.
-Power down, wait 5 seconds, then power on
-Each key may briefly turn on and off throughout the entire keyboard
-Depending on which version you are updating from, some units may not go through the previous step, this is not an error, you can proceed to the next section if it boots fully
When finished, the unit will boot and function as normal. You can then remove the USB stick
-Press Menu, go to the Setup tab, and the firmware's SW Version should match what you downloaded.
-If not, please contact us for further assistance
TROUBLESHOOTING
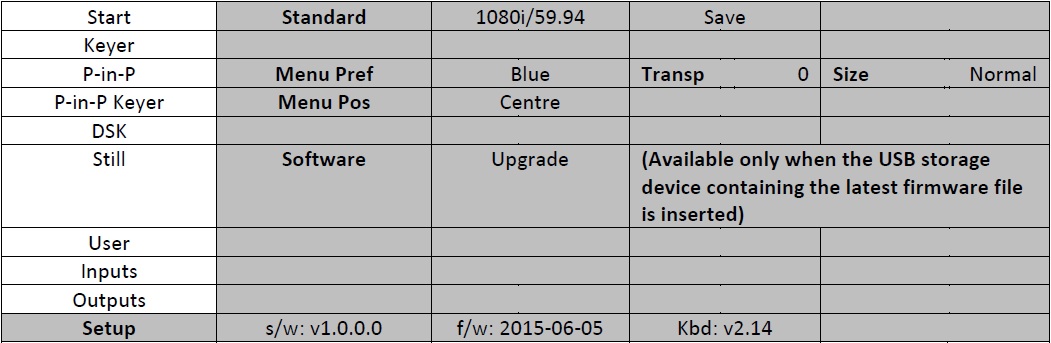
SE-700 Users Please Note: Your unit needs to at least have firmware version 1.0.0.0 and KB firmware version 2.14 or later before running any USB updates. You can view your version information in the Setup tab of the menu.
-If you have version 1.2.2.8 or later, you can proceed to run the latest update.
-If you have version 1.0.0.0 or later, you need to contact Datavideo Support about first updating to version 1.2.2.8 before running the latest update.
- If the setup menu does not have any version info and the sticker on the back of your unit says v0.9.9.2, please contact us regarding updating your unit to 1.0.0.0 first.
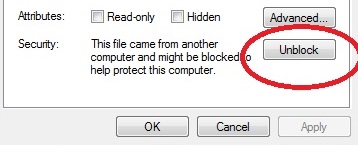
If the switcher fails to recognize the thumb drive and the update button in the switcher's menu remains hidden, try the below Windows solutions and repeat the update steps from the beginning
Right click on the downloaded Zip file within File Explorer (aka Windows Explorer), click "Properties", then under Security, click the "Unblock" button. You can then extract the Zip file and proceed
Please note that this solution is for Windows 7, 8, and 10, and is recommended if you have had previous issues transferring files via USB on your computer. In making these changes to your Windows system you are doing so at your own risk. If you need additional assistance, contact Microsoft Support.
If that does not resolve the issue try a different thumb drive, USB port, or computer. There may be a compatibility issue with your version of Windows, PC hardware settings, Bluetooth settings, USB devices already connected, or 3rd party software installed. There is no simple solution for these issues, but two good starting points would be to try the utilities in the below Microsoft articles. Please note that in using these utilities provided by Microsoft, you are doing so at your own risk. If you need additional assistance, contact Microsoft Support.
Automatically Diagnose and Fix Windows USB Problems (Windows 7/8/10 only)
Hardware Devices are not Working or are not Detected in Windows (Windows 7/8 only)
Also, if you experience an issue where you are unable to safely remove your hard drive from Windows 7, please see this excerpt from the following guide. Please note that in making these changes to your Windows system you are doing so at your own risk, if you need additional assistance, contact Microsoft Support.
-First open Service Manager and ensure that the Bluetooth Support Service is running and set on Automatic.
-To open the service manager, press the start button and type in "Services", you should see an icon with gears.
-Next, open Device Manager and open the Properties box of Disks. Under Policies, ensure that Enable Write caching on the disk is checked. This should then actually work.
-Now right-click on the USB Drive and from the same location in the Properties, change the default setting and select instead Better Performance.
-Now go back to the default Quick Removal setting again.


